
Sunday, 22 June 2014
Thursday, 19 June 2014
Bergen 1799; Anglo-Russian Invasion of Batavia (part II)
"Take it to the Bridge"
Wicked plans brew inside the Batavian/French commanders skull (Peter). Two separate sections of the Anglo-Russian army nearer the village from both the North and the South-West (see part I of this posting on how it got this far).
 In the far northern side (12 o'clock in the picture) we see the distracting actions by the moderate Anglo-Russian light sectioIn the far northern side (12 o'clock in the picture) we see the distracting actions by the moderate Anglo-Russian light section. Keeping considerable Batavian/French from the main action at the village. Two Scottish units keep save bay from a cavalry detachment and several unscratched infantry battalions. A Russian rabble unit (mixed opolchenie) acting as a lure, ready to disappear into sure cover any moment (the bushy/hilly road leading directly behind the enemy lines).
n. Keeping considerable Batavian/French from the main action at the village. Two Scottish units keep save bay from a cavalry detachment and several unscratched infantry battalions. A Russian rabble unit (mixed opolchenie) acting as a lure, ready to disappear into sure cover any moment (the bushy/hilly road leading directly behind the enemy lines).
In the far northern side (12 o'clock in the picture) we see the distracting actions by the moderate Anglo-Russian light sectioIn the far northern side (12 o'clock in the picture) we see the distracting actions by the moderate Anglo-Russian light section. Keeping considerable Batavian/French from the main action at the village. Two Scottish units keep save bay from a cavalry detachment and several unscratched infantry battalions. A Russian rabble unit (mixed opolchenie) acting as a lure, ready to disappear into sure cover any moment (the bushy/hilly road leading directly behind the enemy lines). n. Keeping considerable Batavian/French from the main action at the village. Two Scottish units keep save bay from a cavalry detachment and several unscratched infantry battalions. A Russian rabble unit (mixed opolchenie) acting as a lure, ready to disappear into sure cover any moment (the bushy/hilly road leading directly behind the enemy lines).

Above picture: Russian Pavlov grenadiers 'sandwiched' in between Batavian cavalry in the front and Batavian back-stabbing line infantry (right lower corner). Contemporary colored print of the battle.

Not surprisingly the heat of battle hangs around the village Bergen. The bridge we planted in our scenario was not historically there. This element mimics the real troubles the invasion force had circumventing the numerous canals, streams and marshland , very unpleasant for an 18th century army.
Batavian deployment practically blocking any approach on the bridge from the enemy direction by two artillery pieces. Infantry effectively blowing away any attempt to reach the waterside with ideas to cross it. Wreaking havoc on the Anglo-Russians for several subsequent turns.

Bringing the commander of the severely damaged wing of the invaders into a state of despair. Bringing up his ordnance on the hill and give appropriate return fire, lies within the dice-hand who seems to fail him. Meanwhile the Northern attack binds a considerable amount of troops of the Batavian/French, including the cavalry division but can not make the badly needed progress towards the village centre. Battle results hang in a balance at this time.
A tempting option for an advance on the village centre lies within the crossable water stream (difficult terrain) but the bridge remains the favorite choice for the young general. Pouring in more souls to reach the other side. The answer stays obvious: "French, prime your guns!"

Several units are thrown into the cauldron around the crossing.
Most in vain. Taking heavy losses and morale leakage.
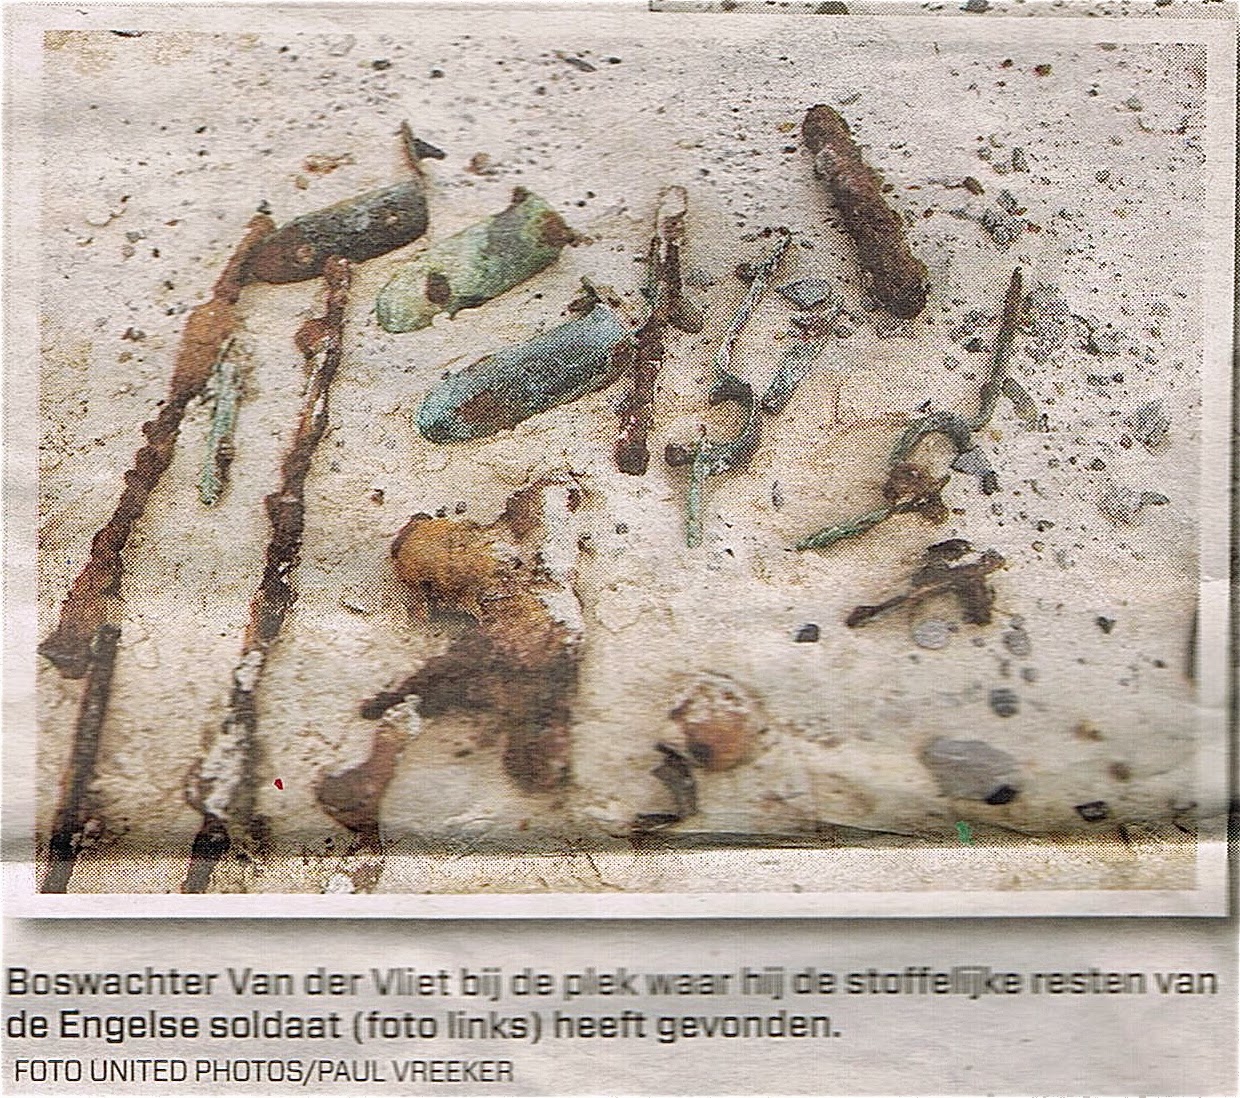 |
| In the year 2011, a Dutch forester Van der Vliet, found the archeological remains of a Coldstream Guardsman. He is expected to have died during the fighting around Bergen/Castricum 1799. (Source: Algemeen Dagblad, Octobre 12, 2011) I can identify parts of multiple muskets here. There are 2 trigger guards! And 3 stock plates. |
The sum of both tabletops: a minor victory for the Batavian/French defenders. Russian- and British forces found themselves in separation and disarray, losing significant parts of their fighting force. The gunning of the bridge was punishing. Failing to take out this battery proved the turning point. Congratulations to commander Daendels (played by Peter).
 |
| Peter (Batavian Cmd. Daendels) |

An important visitor arriving by coach for an inspection of a deployed battery. Cantinière with her off duty 'customers' in the backdrop.

View at the coastline from behind 'Huize Bergen' castle.

The well defended pivotal structure deciding on the invaders fate.

Tuesday, 17 June 2014
Bergen 1799; Anglo-Russian Invasion of Batavia (part I)
"Go to Holland and DO something"
In an attempt to destabilize the French/Batavian (Dutch) patriotic government in the Batavian Republic, Britain send out an expeditionary force under the command of Abercromby. Support would be given by Russian forces. They were only to arrive 20 days later. The action started on the 27 of August 1799. Unexpected for the Batavians and French, the British landed their boats with an army of 'hooligans' on the beaches of the Noord-Holland province.
In this table-top battle 1/72 figures are used. The table is made -up out of modular boards. We decided to land Russians and British alongside each other. The defenders are the French and Batavian troops.


An overview of the opposing 1/72 armies
Russian high commander Hermann, being ambushed and taken prisoner in the woods around Bergen village, only two days after his arrival at the scene.

We used the wargaming rules by Dirk Donvil: About Bonaparte. Battalions used had 10 initial figures. CIC plus an ADC on both sides formed a 3 command dice staff. Individual officers, either attached or unattached, could sum up between 9 and 12 in total per side. All figures painted by Peter (hosting the game in city of Eindhoven, home city to the football club PSV) in enamels and different oil techniques. The kilted redcoats were done by Marcel, using acrylics only. Each figure is based on a coin. All infantry is put into movement trays with suitable spaces to receive the coins. Casualties can be removed from the tray when appropriate. Third player is Stan, a miniatures brother-in-arms over 7 years now.
In early morning secrecy a first battalion of 92reg. Gordon Highlanders set foot on foreign soil, wading the final stretch to the shore through the summer warmed North Sea.They are soon to be followed by an Armada of whaling- and rowboats, set ashore influenced by wind, waves and tidal streams. In the game we used cardboard and playmobil vessels. Not enough though, to drop the whole army in one wave. Three turns sufficed to gather a badly disarrayed lot of 'sons o' bitches' (just annotating the sergeants!) on the beach. How to organize this: Ta, ta! Abercromby our CIC, arrived. The miracle-maker (drums!!!!!).
 |
| Kilted highlanders getting wet feet |
 |
| Second Anglo/Russian landing wave |
 |
| Last units brought in by sea |
*Dispersed landing rule*
To mimic a shabby arrival of units on the shore, we improvised on how to do this. The beach was divided in zones 1 to 6 (see dice markers in picture). One player choose a vessel filled with troops, an other threw a D6 and indicated the landing zone for it. Following this during three subsequent turns, it took a lot of maneuvering (read: several turns) to make this a fighting force. No enemy fire!
One way or another some local fishermen or early farmhands, must have spotted the Anglo-Russian fleet along the coastline. In real the British military intelligence leaked information through the immense burocratic organization around the government and numerous diplomatic liaisons. For the Batavian/French are not at all taken by surprise. In fact, their shared military strength was allocated along every possible threatened portion of coastline, from Zealand up to the most Northern provinces of Friesland and Groningen.

One way or another some local fishermen or early farmhands, must have spotted the Anglo-Russian fleet along the coastline. In real the British military intelligence leaked information through the immense burocratic organization around the government and numerous diplomatic liaisons. For the Batavian/French are not at all taken by surprise. In fact, their shared military strength was allocated along every possible threatened portion of coastline, from Zealand up to the most Northern provinces of Friesland and Groningen.
Batavian Republic cavalry scouts the area. Observations reported to their staff on short notice.
It can not be concealed for long. French and Bavarian local command immediately organize a solid battle line only just out of sight for the invaders. Reserves called out from every corner of the county.
Formed up into a formidable battle line with a central cavalry block and artillery on both flanks.
The initial way to turn up the pressure on the invaders is a massive cavalry charge with no less than three battalions. Anglo-Russian forces are still building up on the seaside and only recently the light cavalry battalion is brought ashore. They immediately prepare for a possible counter action.


Left: British threatened (2 o'clock high!) by massive light cavalry. No skills for a square formation!
Right: Contact! and countercharge by Anglo/Russian cavalry in open left flank. Invasion force (Stan & Marcel) withstood the first fierce blow by Batavian CIC Daendels (Peter).
Heavy infantry guarded artillery pieces deployed on the dunes in the southern part of the landing area, obviously intimidates and keeps the parties at a fair distance of each other. This enables the Anglo/Russians to fully materialize a bridgehead from where a slow advance is initiated. After several skirmishes the Batavian/French retreat at their stronghold: the village of Bergen, blocking the main advance on Alcmaer (inscripted in the 'Arc de Triomphe' in Paris!). The Anglo/Russian army engages the village from two sides. A small and lighter detachment closes in from the North. The main force with artillery and cavalry must enter Bergen from the South-West. In between them and the village centre lies a shallow but boggy stream towards the sea. Different from the light detachment, this main force badly needs a bridge! The Batavian/French badly need reinforcements .
Formed up into a formidable battle line with a central cavalry block and artillery on both flanks.
 |
| Batavian Republic and French battle order, defending Bergen (14-06-2014) |
The initial way to turn up the pressure on the invaders is a massive cavalry charge with no less than three battalions. Anglo-Russian forces are still building up on the seaside and only recently the light cavalry battalion is brought ashore. They immediately prepare for a possible counter action.
Left: British threatened (2 o'clock high!) by massive light cavalry. No skills for a square formation!
Right: Contact! and countercharge by Anglo/Russian cavalry in open left flank. Invasion force (Stan & Marcel) withstood the first fierce blow by Batavian CIC Daendels (Peter).
Heavy infantry guarded artillery pieces deployed on the dunes in the southern part of the landing area, obviously intimidates and keeps the parties at a fair distance of each other. This enables the Anglo/Russians to fully materialize a bridgehead from where a slow advance is initiated. After several skirmishes the Batavian/French retreat at their stronghold: the village of Bergen, blocking the main advance on Alcmaer (inscripted in the 'Arc de Triomphe' in Paris!). The Anglo/Russian army engages the village from two sides. A small and lighter detachment closes in from the North. The main force with artillery and cavalry must enter Bergen from the South-West. In between them and the village centre lies a shallow but boggy stream towards the sea. Different from the light detachment, this main force badly needs a bridge! The Batavian/French badly need reinforcements .
 |
| What would these innocent civilians need? Probably nobody bothers... |
Sunday, 8 June 2014
Württemberger infantry by Siegfried
Fast painting by Siegfried Van Den Brande to prepare the Württemberg line infantry for our 1809 campaign.
Hät Württemberg line infantry and grenadiers.


Subscribe to:
Posts (Atom)