Saturday, 28 December 2024

Return to the Great Trunkroad


More or less forced to absence, I was, from this blog.
Happy to let you all know that I've recently regained access to it again.
Sorry you all had to miss out on several of my played games.
Nothing really new, apart from that I have set my Napoleonic ambitions aside.
Colonial adventures keep me occupied game-wise. Followed directly by Ww2 theatres.
Thats paratrooper and special operations actions, from all parties, mainly.

Below, a frozen moment from a now running game. Just for atmosphere.
Nick will know it, as will regular readers of this blog too. There was an earlier posting, covering the same scenario. Nick did that, some years ago. It was published here.
It's situated in the Indian Mutiny of 1857.
From the scenario booklet Colonial Conflicts.
Badli Ki Serai; the roadblock to Dehli.
I play this solo using a hotchpotch of rulesets that together, suit me well.

What we see in the picture is just after turn 5 (of 8).
Mutineers in the centre, sandwiched from both flanks by 2 'Her Majesty's and West Indian Company' brigades. A third brigade hangs in front of the blockade and does little damage.
The serai, (a caravan restingplace, a bit like an inn) on the righthand side, has already been overtaken by the British troops.


Above two pictures show the initial layout of the gametable. (1) British depoyment zone (2) Walled village of Badli Ki, mutineers left flank (3) Mutineers centered, improvised barricades and gun positions (4) The serai, forming the utmost right flank of the mutineers (5) swamp terrain (6) the Great Trunkroad leading to Dehli.


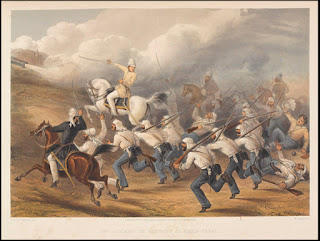
Contemporary print resembling the storming of the sandbagged heavy gun battery on the center-right of the mutineers.


Deployment of Her Majesty's and Honourable West India Company's forces. The marked brigade (Grave's) got separated from the mainforce, got lost and entered the field later during the battle and in another spot. There's an arrival table in the scenario, to regulate this.


In above photo, the third brigade, housing all cavalry elements, enters the field front the mutineers left flank (as per the scenario). Ordered to make this manouvre by the C-in-c, based on recce.


Tuesday, 17 December 2024

Zulu Movie Tribute Game

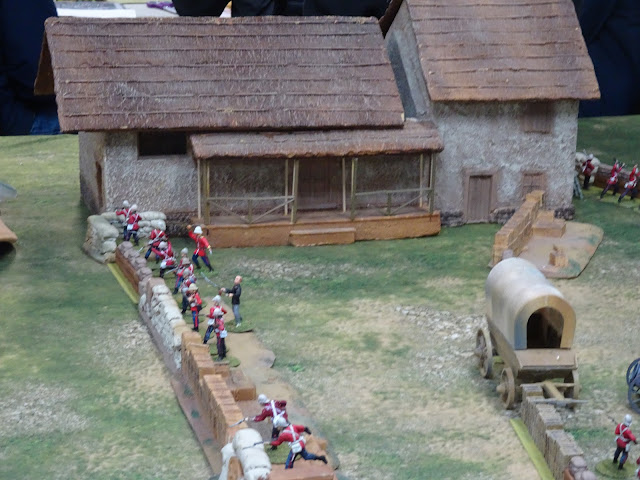
 2024 marks the 60th anniversary of the release of the movie Zulu. Seeing this film on the big screen on its initial release helped spark my lifelong interest in British colonial history. I have run Rorke's Drift games in 54mm before, but after the surprise gift of a set of Conte Collectible buildings, I decided to run a game based on the movie and not history. As it turned out, using the movie defense layout made it more difficult for the British with a larger area to defend, which worked well for the wide screen shots of the movie but handicapped the British as the distances made it challenging to plug gaps. Victory conditions for the Zulus were to capture two out of three: the hospital, the storehouse/church and the redoubt. Victory condition for the 70 British was to score 150 kills, approximately half the  historic number, which would stop the attack. Rules used were The Men Who Would Be Kings, with special rules for the fight in the hospital. Following the movie, I even had cattle in the kraal, ready to stampede the unsuspecting Zulus. The Zulu players were limited to three units per side in the initial assault, with recycled units being placed randomly. There were nine units of sixteen Zulus in the first assault. The British were allowed to use one unit, spending two turns, to construct the redoubt. The Zulus centered their main attack on the northeast corner of the defenses, which were lightly defended. They managed to climb onto the roof of the storehouse/church and infiltrate into the redoubt and the church. Progress was slower for the Zulus on the west and northwest, but poor fire dice rolling allowed the Zulus to come over the south wall and from then on the British were doomed. When I have run the game before, using the historic layout, the result was a much closer game, but, even though the odds were against the British players this time a good time was had by all.

P.S. The British had to roll any pair of doubles once a turn to release the cattle. They finally made the roll on the last turn, too late to affect the outcome.

The soldiers in the hospital were not allowed to begin evacuating the wounded until the Zulus attacked the building.


Lt. Bromhead and Corporal Schiess defend the south ramparts


The cattle, ready to stampede


South ramparts stand ready


First Zulu move on the north ramparts


Full screen shot of the north ramparts


Lt. Chard defending the north ramparts


The fight inside the redoubt


Zulus inside the church


Poor Surgeon Reynolds


The north ramparts hold.


Zulus inside the south ramparts


The last stand of Lt. Bromhead


Monday, 18 November 2024

Hät 1/32 test figures - Austrian Napoleonic Line infantry

 Painted as Line Infantry Rgt 29 Lindenau. Great figures to paint! Nice poses.

For the leather, I did put a bit of yellow paint to the white, to have some diffrence to the uniforms white.


Tuesday, 29 October 2024

Charge of the Light Brigade After Action Report


How to make a fun game of the Charge of the Light Brigade? I decided to focus on the limited variables, so I made activation card driven, based on the mechanic used in Fistful of Lead where one card is dealt per unit and the player chooses which unit to active first based on Bridge suit order. I borrowed random movement from The Sword and the Flame. The Light Brigade began with 3 dice worth of movement, adding one dice per move up to a total of 6 dice. For combat, I used the battle dice from About Napoleon. The goal was to make casualties manageable, given the small size of the Light Brigade regiments, each consisting of 7 miniatures.
I set up the Light Brigade at one end of the 7.5-foot table and a Russian battery of three guns, supported by 3 Cossack units, were at the other end, a little over 6 feet away. On each side of the valley, I placed an additional Russian artillery piece and 2 units of 12 Russian infantry. Historically, Russian small arms fire had a negligible effect on the charge, due to the Russian smooth bore muskets and poor Russian marksmanship. I gave the muskets a range of only 12 inches.
 
First move, the Light Brigade dice rolls averaged 12 inches, well above average. The Russian cannon on the north side of the valley scored 2 casualties on the 17th Lancers. The Russian cannon on the south side did not have the cavalry in its angle of fire and the battery at the end of the valley was just out of range.
 
Second move, the Light Brigade moved another 12 inches, keeping in good order. The Russian artillery on the north side pivoted to meet the advancing Chasseurs d’Afrique. Long range artillery from the end of the valley scored another 2 hits on the 17th Lancers. At this rate, the Lancers would be destroyed well before they reach their target. We agree to institute saving throws, saving on a 4-6 for long range (48 inches) and 5,6 for short range (24 inches). Saving throw saved 1 Lancer. Artillery on the south side scored 2 hits on the 13th Light Dragoons but lucky saving throws negated the hits.
 
Third move, the Chasseurs charged the Russian artillery on the north side and killed the crew, but then need to retire to regroup. Rolling 5 movement dice for each regiment of the Light Brigade, the units began to spread out. The 17th Lancers move furthest ahead and take 1 more kill. The 13th Light Dragoons lost 3 casualties from the battery at the end of the valley.
 
Fourth move, the Lancers, now down to 3 troopers, charged the middle Russian gun, killing 2 gunners and the gun limbers up and retreats off the table. The 13th Light Dragoons charged the gun to their front, killing the gunners and retired 10 inches to regroup. The gun on the south side of the valley killed 2 troopers of the 11th Hussars.
 
Fifth move, the Cossacks charged the 13th Light Dragoons. The Cossacks lost more figures but rolled 2 flags which pushed the 13th back. The Lancers now charged the remaining Russian gun and killed its crew. The 11th Hussars counter charged the Cossacks who fought the 13th. The results are a draw and the Hussars retired back 10 inches.
 
Sixth and seventh moves, we decided that the Lancers, 13thLD and 11th Hussars have done their duty, taking out the guns, and they begin the ride back to their starting point. The reserve, consisting of the 4th Light Dragoons and the 8th Hussars, charge the remaining Cossacks, and retire with light casualties. In this game, the Light Brigade began with 35 figures. They lost 15 and would probably lose another couple of figures in their retreat. So they did a little better than their historic counterparts who lost 360 killed and badly wounded out of 673.
 
First photos are a series taken one per turn to show the progress of the game.
 
 I dressed for the game

Starting positions

End of first move
 
End of second move

End of third move

End of fourth move

End of fifth move
 
More action photos follow